I feel like I host these challenges fairly frequently, yet my jaw fell to the floor when I realized that it was December when I last challenged you to do a little organizing and projecting and then share it here. Oh my! January was the month of organization, so I am betting that a few of you are ready for today! And if not? No worries, you have another month before the party ends. But it can't end if it hasn't even begun yet, so.....

So what have you all been up to? Closet takeovers? Drawer cleanings? Cabinet organizing? Furniture building? I can't wait to see!
I just shared a tiny bit of all of the awesomeness from the last link party here, and I know I have said it before, but I will say it again. I really love these parties and having a moment to read about YOU! I know link parties have been a bit over done throughout the years, but I truly enjoy checking in on projects being created by others. Reading stories of trials and triumphs. Celebrating with you. Crying with you... Tears of joy of course!
So what have we been up to since the previous link party?
We typically flutter around the house and do projects based on a need change or a frustration or just out of preference, but there is generally a lot of variety in what we tackle. However, this year we kicked off a kitchen renovation that has been taking up all of our time, budget and energy. So I made a goal of staying truly focused on a single space (the kitchen), while also allowing myself to stray and implement quick little organizing hits around the house each week. Those smaller organizing projects are not typically DIY's or costly, but still needed to make a small difference in how our home functions. So far, it has been a pretty nice balance. Let's take a moment to quickly recap our projects big and small over the past two months.
Just before we gutted our kitchen to blank floors and studs, I took time to update our home tour with details from our previous kitchen space. It was nice to have a memory just before we made it a giant mess.

Isn't that refreshing? It lasted a whole minute and then it was time to demo that wall! The entire kitchen demolition was a bit slow going. I was waiting for Jonathan and Drew to come in and rescue us and make things happen with the snap of their fingers. No such luck.

A week after the last floor staple was pulled, I put in the last nail of our new ceiling planks. Although not at all pretty yet, they really started unifying our two spaces.

Then came the glorious faux beams! We heart those beams to the moon and back!

And then hearted those same beams to the end of the universe and back once they were painted! Having the walls patched and painted was also a giant leap in the project! Although the verdict is still out on the wall color, it is growing on us more and more each day. We will wait until everything is in place before doing something drastic and painting again.

The following week we started installing our IKEA cabinets, and although it was a pretty straight-forward process, we shared a few things we learned along the way.

And as we wait for our center island, we shared a few smaller updates we made with moulding, lighting, our dishwasher and more lovely cabinets. Yummy.

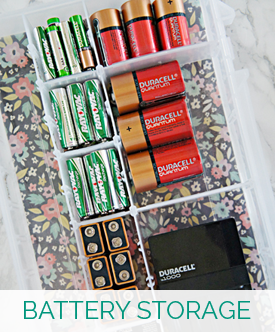
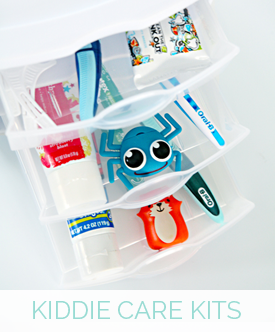
I keep stepping in my own drool puddles as I gaze at our new open space. And to keep a nice balance of giant projects and itty bitty organizing updates, here are a few quick tips we shared as well:
Now, it is your turn to link up and share your favorite projects with me and the rest of this fab community (the last organizing challenge had 58,000 views!).
As always, an over-sized thank you to all who participate in these challenges. Checking out your posts is my guilty pleasure every month, so bring it on! This month I will also be sharing some of your projects via social media and as always, will be doing a recap at the end of the party.

IHeart Organizing is not responsible for the content uploaded and shared within the Monthly Link Parties on within the #wiorn hashtag feed. However, it is a great way to join together in making organizing fun, so let's use our best internet etiquette and have a great time with this social party.
So what have you all been up to? Closet takeovers? Drawer cleanings? Cabinet organizing? Furniture building? I can't wait to see!
I just shared a tiny bit of all of the awesomeness from the last link party here, and I know I have said it before, but I will say it again. I really love these parties and having a moment to read about YOU! I know link parties have been a bit over done throughout the years, but I truly enjoy checking in on projects being created by others. Reading stories of trials and triumphs. Celebrating with you. Crying with you... Tears of joy of course!
So what have we been up to since the previous link party?
We typically flutter around the house and do projects based on a need change or a frustration or just out of preference, but there is generally a lot of variety in what we tackle. However, this year we kicked off a kitchen renovation that has been taking up all of our time, budget and energy. So I made a goal of staying truly focused on a single space (the kitchen), while also allowing myself to stray and implement quick little organizing hits around the house each week. Those smaller organizing projects are not typically DIY's or costly, but still needed to make a small difference in how our home functions. So far, it has been a pretty nice balance. Let's take a moment to quickly recap our projects big and small over the past two months.
Just before we gutted our kitchen to blank floors and studs, I took time to update our home tour with details from our previous kitchen space. It was nice to have a memory just before we made it a giant mess.
Isn't that refreshing? It lasted a whole minute and then it was time to demo that wall! The entire kitchen demolition was a bit slow going. I was waiting for Jonathan and Drew to come in and rescue us and make things happen with the snap of their fingers. No such luck.
A week after the last floor staple was pulled, I put in the last nail of our new ceiling planks. Although not at all pretty yet, they really started unifying our two spaces.
Then came the glorious faux beams! We heart those beams to the moon and back!
And then hearted those same beams to the end of the universe and back once they were painted! Having the walls patched and painted was also a giant leap in the project! Although the verdict is still out on the wall color, it is growing on us more and more each day. We will wait until everything is in place before doing something drastic and painting again.
The following week we started installing our IKEA cabinets, and although it was a pretty straight-forward process, we shared a few things we learned along the way.
And as we wait for our center island, we shared a few smaller updates we made with moulding, lighting, our dishwasher and more lovely cabinets. Yummy.
I keep stepping in my own drool puddles as I gaze at our new open space. And to keep a nice balance of giant projects and itty bitty organizing updates, here are a few quick tips we shared as well:
 |  |
 |  |
 |  |
 |
As always, an over-sized thank you to all who participate in these challenges. Checking out your posts is my guilty pleasure every month, so bring it on! This month I will also be sharing some of your projects via social media and as always, will be doing a recap at the end of the party.
IHeart Organizing is not responsible for the content uploaded and shared within the Monthly Link Parties on within the #wiorn hashtag feed. However, it is a great way to join together in making organizing fun, so let's use our best internet etiquette and have a great time with this social party.
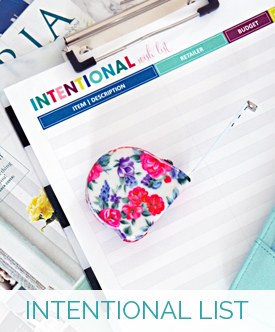
You all know how much I personally heart a pretty paper project. Decorative paper can make anything fun and fabulous! I especially love how it allows you to repurpose everyday items or upgrade inexpensive finds, into something that you want to look at and use. Aniko, from Place of My Taste, found the most beautiful paper and created sweet and simple storage that she uses at her desk, however, I also envision it being great in an entryway, bedroom or bathroom. Here she is now to share the details of her quick and easy yet oh-so-gorgeous and budget friendly storage project.

Hello Everyone! It's Aniko from Place Of My Taste and I am so thrilled to be here again today. I am still humbled to be among such amazing and talented ladies on the iHeart Organizing team. Back in October, on my debut here, I shared a wonderful jewelry organizer with you all, and today I will show you how I prettied up a plain $1 compartment container with gorgeous wrapping paper to brighten up my office desk and organize my small desk accessories. When it comes to organizing, I always try to bring in style and color to the space I am working on. Last fall I took the One Room Challenge and was challenged to make over a room in 6 weeks. I chose my really cluttered, unorganized and unfinished office space. I planed every little detail out and I can probably proudly say that 90% of the planned projects were finished.
Here is a quick image for you to get an idea how my office/craft room looks like right now, so you can vision my new pretty desk organizer in my space.

Target is my favorite one stop shop. I know, yours too, right? I think Target was pretty smart to add The One Spot section right at the door. Sometimes I don't even make it further as I can find so many fabulous things there. That is where I picked up this inexpensive, $1 plastic compartment container a couple months ago, saying, "I am sure I can use this for something". Story of my life!
I also picked up this oh my goodness gorgeous flower wrapping paper while in the store. As soon as I spied this paper from distance, I knew that "she" will come home with me. Loving the colors and the watercolor effect.

Things I used:

This was a 10 minute quick transformation. First I took off the lid from the plastic compartment container and traced the shape on the back of the wrapping paper. Then, I repeated and cut out 4 little pieces to cover the inside of the container. I applied glue on my paintbrush and brushed the glue on the lid as well as the bottom of the container. Smoothed the wrapping paper slowly with my hand.
That is it my dears!
Quick, easy, inexpensive and gorgeous little container/organizer makeover.

While I was on roll with organizing my washi tapes and paper binder clips to my container, I quickly prettied up my paper binder clips with my golden washi tape. Simple yet very decorative fix.

15 minutes later I had the perfect little organizer container dressed up for my tiny office accessories.


Here is how my darling organizer shows on my desk. What do you think?

If you would like to see more of this office room, come tour my Office Room/Craft Room Reveal.

Well, I hope that I inspired you to create something beautiful for your home, for yourself or for a friend. Inspiration is everywhere! Will be back in a few months... until then come and see what I am working on currently or come grab a yummy 15 minute recipe. Cheers!

"Hey there. My name is Aniko and I blog over at Place Of My Taste. I am a wife, mother, business owner by day, DIY-er by night, design, decor and photography lover by heart who loves to cook, taste wine, dance for therapy and create all things beautiful. I share all this love over at my blog - at my happy place. Come see me there. xo"
Hello Everyone! It's Aniko from Place Of My Taste and I am so thrilled to be here again today. I am still humbled to be among such amazing and talented ladies on the iHeart Organizing team. Back in October, on my debut here, I shared a wonderful jewelry organizer with you all, and today I will show you how I prettied up a plain $1 compartment container with gorgeous wrapping paper to brighten up my office desk and organize my small desk accessories. When it comes to organizing, I always try to bring in style and color to the space I am working on. Last fall I took the One Room Challenge and was challenged to make over a room in 6 weeks. I chose my really cluttered, unorganized and unfinished office space. I planed every little detail out and I can probably proudly say that 90% of the planned projects were finished.
Here is a quick image for you to get an idea how my office/craft room looks like right now, so you can vision my new pretty desk organizer in my space.
Target is my favorite one stop shop. I know, yours too, right? I think Target was pretty smart to add The One Spot section right at the door. Sometimes I don't even make it further as I can find so many fabulous things there. That is where I picked up this inexpensive, $1 plastic compartment container a couple months ago, saying, "I am sure I can use this for something". Story of my life!
I also picked up this oh my goodness gorgeous flower wrapping paper while in the store. As soon as I spied this paper from distance, I knew that "she" will come home with me. Loving the colors and the watercolor effect.
Things I used:
- gorgeous flower wrapping paper
- scissors
- $1 compartment container
- school glue
- paintbrush
- pencil
This was a 10 minute quick transformation. First I took off the lid from the plastic compartment container and traced the shape on the back of the wrapping paper. Then, I repeated and cut out 4 little pieces to cover the inside of the container. I applied glue on my paintbrush and brushed the glue on the lid as well as the bottom of the container. Smoothed the wrapping paper slowly with my hand.
That is it my dears!
Quick, easy, inexpensive and gorgeous little container/organizer makeover.
While I was on roll with organizing my washi tapes and paper binder clips to my container, I quickly prettied up my paper binder clips with my golden washi tape. Simple yet very decorative fix.
15 minutes later I had the perfect little organizer container dressed up for my tiny office accessories.
Here is how my darling organizer shows on my desk. What do you think?
If you would like to see more of this office room, come tour my Office Room/Craft Room Reveal.
Well, I hope that I inspired you to create something beautiful for your home, for yourself or for a friend. Inspiration is everywhere! Will be back in a few months... until then come and see what I am working on currently or come grab a yummy 15 minute recipe. Cheers!
"Hey there. My name is Aniko and I blog over at Place Of My Taste. I am a wife, mother, business owner by day, DIY-er by night, design, decor and photography lover by heart who loves to cook, taste wine, dance for therapy and create all things beautiful. I share all this love over at my blog - at my happy place. Come see me there. xo"
As much as I am in full on kitchen mode around here, I am ready for some new inspiration. And I am not talking kitchen inspiration (I have seen enough of that to make my head explode lately). I am talking organizational, colorful, sweet, studio inspiration.

As a fellow small business owner, I can totally relate to the importance of working in a space that makes your heart happy. A space that ignites creativity yet functions well for your daily routine. When I first clicked over to Katelyn's studio, my eyes were as big as the moon. Every last moment spoke to me. It is fresh, filled with love, organized and is designed from a beautifully soothing color palette. Smitten is only the tip of the iceberg.
The best part? I know not everyone has a small business or studio, but many of us have bedrooms, closets, home offices and even living areas that must function as some sort of working space. This room is inspirational and offers eye candy for any type of room.
Katelyn runs her blog, business and shop from this space, and I asked her to stop by and share more about how she made it special and functional for her. Here she is now with more details.
What is the main function of the space?

"Having a happy work space has always been important to me. When I decided to expand my blog into a Stationery Line & full time business I knew I would need to upgrade my workspace. After a few months of organized chaos I was able to transform my spare room into a bright & cheerful area filled to the brim with bright colors, inspirational imagery & lots of creative supplies for all of my artistic hobbies."
Any superstar tips for keeping it organized?

"I am BIG on keeping things organized & intentionally chose items for the studio that would not only look great but would be able to store everything in a clean & colorful way. One of my favorite finds here is my Bisley Light Blue 5-Drawer Cabinet!"

What items did you find were essential when organizing this space and why?

"Clean & classic lines were really important to me in this space. I used White KASSETT Boxes & Magazine Files to organize a wide array of items in a uniform way."
What did you do to go the extra mile and "make it pretty"?

"Being a stationery designer, I wanted the space to reflect my love for HAPPY MAIL! I sought out fabulous vintage finds, colorful accents & decorated the space with products from my shop. Favorites here include my cheerful notepads, a vintage La Poste Sign & a fun Mint Green Tape Dispenser!"

What items did you DIY to stay on a budget?

"I really wanted to have a beautiful display case to feature my products. I turned to the versatile IKEA Billy Bookcase & enlisted the handy skills of my husband to create the perfect custom bookcase for my studio. (Get the full DIY tutorial on my blog here!)"
How has it impacted your life for the better?

"I have always believed that you should surround yourself with beautiful things, wonderful people & celebrate the simple delights in everyday living. Having the perfect place for everything & being able showcase my work in such a happy space brings me so much joy! I truly love having this bright space to come to & be creative."

Seriously stunning right? Everything from the wall color to the storage furniture to the sweet memo board paired with vintage touches... sigh. I am in love! Even regular ol' filing cabinets look chic and special in her gorgeous studio.
I really do heart the heart you all put into your makeovers big and small. You can see this space was well thought out, there is an attention to detail and so much joy radiates from the screen (and I am sure even more in person). Many of the items are very basic pieces (file cabinets, craft table, globes, bookcases, boxes....), yet they were given little updates with paint, moulding and color to take them to the next level. A job very well done Katelyn! I will be moving in next week, wink wink!
You can find even more details and a list of sources over on Katelyn's blog here.

As a fellow small business owner, I can totally relate to the importance of working in a space that makes your heart happy. A space that ignites creativity yet functions well for your daily routine. When I first clicked over to Katelyn's studio, my eyes were as big as the moon. Every last moment spoke to me. It is fresh, filled with love, organized and is designed from a beautifully soothing color palette. Smitten is only the tip of the iceberg.
The best part? I know not everyone has a small business or studio, but many of us have bedrooms, closets, home offices and even living areas that must function as some sort of working space. This room is inspirational and offers eye candy for any type of room.
Katelyn runs her blog, business and shop from this space, and I asked her to stop by and share more about how she made it special and functional for her. Here she is now with more details.
What is the main function of the space?
"Having a happy work space has always been important to me. When I decided to expand my blog into a Stationery Line & full time business I knew I would need to upgrade my workspace. After a few months of organized chaos I was able to transform my spare room into a bright & cheerful area filled to the brim with bright colors, inspirational imagery & lots of creative supplies for all of my artistic hobbies."
Any superstar tips for keeping it organized?
"I am BIG on keeping things organized & intentionally chose items for the studio that would not only look great but would be able to store everything in a clean & colorful way. One of my favorite finds here is my Bisley Light Blue 5-Drawer Cabinet!"
What items did you find were essential when organizing this space and why?
"Clean & classic lines were really important to me in this space. I used White KASSETT Boxes & Magazine Files to organize a wide array of items in a uniform way."
What did you do to go the extra mile and "make it pretty"?
"Being a stationery designer, I wanted the space to reflect my love for HAPPY MAIL! I sought out fabulous vintage finds, colorful accents & decorated the space with products from my shop. Favorites here include my cheerful notepads, a vintage La Poste Sign & a fun Mint Green Tape Dispenser!"
What items did you DIY to stay on a budget?
"I really wanted to have a beautiful display case to feature my products. I turned to the versatile IKEA Billy Bookcase & enlisted the handy skills of my husband to create the perfect custom bookcase for my studio. (Get the full DIY tutorial on my blog here!)"
How has it impacted your life for the better?
"I have always believed that you should surround yourself with beautiful things, wonderful people & celebrate the simple delights in everyday living. Having the perfect place for everything & being able showcase my work in such a happy space brings me so much joy! I truly love having this bright space to come to & be creative."
Seriously stunning right? Everything from the wall color to the storage furniture to the sweet memo board paired with vintage touches... sigh. I am in love! Even regular ol' filing cabinets look chic and special in her gorgeous studio.
I really do heart the heart you all put into your makeovers big and small. You can see this space was well thought out, there is an attention to detail and so much joy radiates from the screen (and I am sure even more in person). Many of the items are very basic pieces (file cabinets, craft table, globes, bookcases, boxes....), yet they were given little updates with paint, moulding and color to take them to the next level. A job very well done Katelyn! I will be moving in next week, wink wink!
You can find even more details and a list of sources over on Katelyn's blog here.
* All images courtesy of Love. Luck. Kisses & Cake.
ATTENTION!! Want to be featured in a Reader Space edition? Have an awesome organizing story to share? I am looking for projects that have made a positive impact to your life, big or small. They can be anything from an organized drawer or cabinet to an entire room. Please submit your story and photos to iheartreaderspace@gmail.com, and I would heart to feature them right here on the blog!! Photos should be high resolution and unedited. Please include a description of the project and how it has changed your life or routine for the better! Oh, and no worries my friends, we will NEVER judge "before" pictures because that just wouldn't be nice! Only love goes on at this blog!
Happy Monday! Did you have a nice weekend? We were busy little bees again, juggling sporting events, a birthday party and a little bit of kitchen work. I love productive weekends as much as the next person, but I am already counting the days to next weekend...
Today we are stopping in with our weekly kitchen update. It will most likely be our last kitchen update for a few weeks, as we have done as much as we can until we receive our center island. Once that is in place, we can install our flooring, trim, backsplash and all of the really important finishing touches that will warm everything up! Although I feel like this process is moving slower than molasses, we really couldn't be more thrilled with where things are at and knowing that the end is near!

Last week we shared our experience installing IKEA kitchen cabinets. We have been living with them for over a week now, and although we are not using and abusing them the way we will once everything is loaded up and being used full time, we can honestly say that so far we are smitten. I have cleaned the faces a few times due to construction dust and some cooking grime and everything wipes up so nicely. The soft close function continues to fascinate us all, and we appreciate that we can easily tweak the cabinet hinges to ensure everything lines up and straightens out as things continue to settle in (as you can see above, we still have a few pieces to adjust).
The biggest change we made this past week, was install the remaining cabinets on the far wall (where the beautiful aqua hutch use to live).

Although I have a serious crush on that hutch (and may have a back-up plan for it down the road), the wall of cabinets allowed us to really maximize our storage. The cabinets are only 12" deep, while the hutch was much bulkier and wasn't able to secure tightly to the wall, so we also gain floor area. Plus, look at all of that storage; drawers and cabinets galore!

Right now it is looking a smidge top heavy, but I have plans to make this little space a bit more custom. We took a quick trip back to IKEA this weekend to grab another rail to allow us to float the lower cabinets (they were installed in the same fashion as the uppers). Once the floors are installed, I plan to add decorative legs to the base cabinets to give them more of a furniture feeling (they will only be decorative, not intended to support the cabinets). The legs paired with a piece of counter cut to match the adjoining kitchen should really beef them up a bit.
The lower cabinets will be fantastic for storing vases, entertaining decor, party supplies and outdoor dining items, while the uppers will display barware and serving dishes. Another tip when it comes to these glass faced IKEA cabinets, is to order extra glass shelves. Each cabinet comes with two, however, visually you can streamline the display by placing a glass shelf behind each panel of the door. We are still waiting on the extra shelves to arrive.

A wonderful reader let me know that IKEA now has plugs for all of those cabinet holes! Our IKEA has been sold out, but you can bet I am going to scoop boatloads! Thumb up IKEA!
On each end of the kitchen/living area, we finally installed a small strip of decorative trim to really complete the look of the planked ceiling. We went with 12' strips of primed cove moulding, which I painted to match the ceiling color (Benjamin Moore's Simply White).

They were installed with the brad nailer, and they really do finish things off nicely.

Another tip I received from a reader a few years ago, was to upgrade the outlet and light switch plates. Ours were previously an almond color, so we have been waiting for kitchen update day to swap everything out. She recommend these from Amazon, and I have had them saved to my wish list ever since. I finally pulled the trigger, and I really love the decorative detailing they offer.

They are white, however, not a brilliant white. They look great with the ceiling and IKEA cabinets, and even the switch looks OK, but the electrical outlet whites did not match and it totally bugs me. I plan on taking a cover to the home improvement store to try and find a closer match. My fingers are crossed tight that I find something because I really do heart the decorative plates.
Here is the view looking at the new wall of cabinets paired with the tall, beautifully planked and beamed ceiling. I just sit and gaze at these ceilings for minutes at a time. They really are awe inducing.
A few other finishing touches we added to the cabinets include more side panels and decorative moulding below the upper cabinets.

IKEA cabinets are simple white boxes which are then covered with panels to match the door styles. You can see above the panels are designed to go below the box of the cabinet, and decorative moulding finishes things off. These little details really did make a difference in the feeling of the cabinets as a whole. We are still waiting for one more cabinet to piece in next to the upper corner cabinet, and once that is installed, we can finish the panels and moulding below, and also add our own decorative moulding to all of the cabinet tops.

In other kitchen news, I popped open a bottle of wine last night. I just had to celebrate the resolution of the dishwasher let down.

Wait, what dishwasher? The one you would never know what there because it now has a decorative, integrated cabinet face! Woot!
I shared a little about the dilemma last week, however, long story short is that IKEA no longer had their integrated model the day we finally put in our kitchen order. I kept the decorative panel piece just in case we were able to find another model that would work, but after a lot of searching, nothing fit our budget. So we purchased a standard dishwasher instead. During a recent trip to IKEA, I spotted integrated dishwashers with their new kitchen line. And they worked with the old line also! One dishwasher returned, one dishwasher purchased and I am glowing about this magical update!

Our pendants arrived in the mail last week. I purchased a vintage chandelier on Craigslist for over the dining table (which my in-laws will be driving home from their place in Florida in a few weeks), so I had been searching for pendants that would sort of just fade away and let the chandelier become the star of the show. The chandelier has small bits of gold accents, which meant I also had to work with that during my search. I ultimately selected and ordered these from Wayfair, I appreciated the simple glass shade, the price and the combo of nickel and brass accents.

We used this advice from Houzz to determine the appropriate hanging height, as these will live above our center island. Overall, I really love them, but the wonky wire is really distracting my eyes. I have read that the weight of the light will eventually straighten the wires, so I am giving them some time. Otherwise, I may add rods to dress them up a bit.

And that is where we are another week later. A few little details add up to a much more finished space. I am ready to start moving back in, but may be getting ahead of myself a bit. For now, I will just have to sit back, admire all of our hard work and play the hurry-up-and-wait game for the remaining pieces of the kitchen puzzle to arrive. Then we can get back at it!


You can follow all of the kitchen progress here.
P.S. Thank you SO much for nominating iHeart Organizing for the Better Homes & Gardens DIY Blogger Award! You can cast your vote here throughout the next six weeks. Bryan and I are continuously grateful for all of your support! Smooches!
Today we are stopping in with our weekly kitchen update. It will most likely be our last kitchen update for a few weeks, as we have done as much as we can until we receive our center island. Once that is in place, we can install our flooring, trim, backsplash and all of the really important finishing touches that will warm everything up! Although I feel like this process is moving slower than molasses, we really couldn't be more thrilled with where things are at and knowing that the end is near!
Last week we shared our experience installing IKEA kitchen cabinets. We have been living with them for over a week now, and although we are not using and abusing them the way we will once everything is loaded up and being used full time, we can honestly say that so far we are smitten. I have cleaned the faces a few times due to construction dust and some cooking grime and everything wipes up so nicely. The soft close function continues to fascinate us all, and we appreciate that we can easily tweak the cabinet hinges to ensure everything lines up and straightens out as things continue to settle in (as you can see above, we still have a few pieces to adjust).
The biggest change we made this past week, was install the remaining cabinets on the far wall (where the beautiful aqua hutch use to live).
Although I have a serious crush on that hutch (and may have a back-up plan for it down the road), the wall of cabinets allowed us to really maximize our storage. The cabinets are only 12" deep, while the hutch was much bulkier and wasn't able to secure tightly to the wall, so we also gain floor area. Plus, look at all of that storage; drawers and cabinets galore!
Right now it is looking a smidge top heavy, but I have plans to make this little space a bit more custom. We took a quick trip back to IKEA this weekend to grab another rail to allow us to float the lower cabinets (they were installed in the same fashion as the uppers). Once the floors are installed, I plan to add decorative legs to the base cabinets to give them more of a furniture feeling (they will only be decorative, not intended to support the cabinets). The legs paired with a piece of counter cut to match the adjoining kitchen should really beef them up a bit.
The lower cabinets will be fantastic for storing vases, entertaining decor, party supplies and outdoor dining items, while the uppers will display barware and serving dishes. Another tip when it comes to these glass faced IKEA cabinets, is to order extra glass shelves. Each cabinet comes with two, however, visually you can streamline the display by placing a glass shelf behind each panel of the door. We are still waiting on the extra shelves to arrive.
A wonderful reader let me know that IKEA now has plugs for all of those cabinet holes! Our IKEA has been sold out, but you can bet I am going to scoop boatloads! Thumb up IKEA!
On each end of the kitchen/living area, we finally installed a small strip of decorative trim to really complete the look of the planked ceiling. We went with 12' strips of primed cove moulding, which I painted to match the ceiling color (Benjamin Moore's Simply White).
They were installed with the brad nailer, and they really do finish things off nicely.
Another tip I received from a reader a few years ago, was to upgrade the outlet and light switch plates. Ours were previously an almond color, so we have been waiting for kitchen update day to swap everything out. She recommend these from Amazon, and I have had them saved to my wish list ever since. I finally pulled the trigger, and I really love the decorative detailing they offer.
They are white, however, not a brilliant white. They look great with the ceiling and IKEA cabinets, and even the switch looks OK, but the electrical outlet whites did not match and it totally bugs me. I plan on taking a cover to the home improvement store to try and find a closer match. My fingers are crossed tight that I find something because I really do heart the decorative plates.
Here is the view looking at the new wall of cabinets paired with the tall, beautifully planked and beamed ceiling. I just sit and gaze at these ceilings for minutes at a time. They really are awe inducing.
A few other finishing touches we added to the cabinets include more side panels and decorative moulding below the upper cabinets.
IKEA cabinets are simple white boxes which are then covered with panels to match the door styles. You can see above the panels are designed to go below the box of the cabinet, and decorative moulding finishes things off. These little details really did make a difference in the feeling of the cabinets as a whole. We are still waiting for one more cabinet to piece in next to the upper corner cabinet, and once that is installed, we can finish the panels and moulding below, and also add our own decorative moulding to all of the cabinet tops.
In other kitchen news, I popped open a bottle of wine last night. I just had to celebrate the resolution of the dishwasher let down.
Wait, what dishwasher? The one you would never know what there because it now has a decorative, integrated cabinet face! Woot!
I shared a little about the dilemma last week, however, long story short is that IKEA no longer had their integrated model the day we finally put in our kitchen order. I kept the decorative panel piece just in case we were able to find another model that would work, but after a lot of searching, nothing fit our budget. So we purchased a standard dishwasher instead. During a recent trip to IKEA, I spotted integrated dishwashers with their new kitchen line. And they worked with the old line also! One dishwasher returned, one dishwasher purchased and I am glowing about this magical update!
Our pendants arrived in the mail last week. I purchased a vintage chandelier on Craigslist for over the dining table (which my in-laws will be driving home from their place in Florida in a few weeks), so I had been searching for pendants that would sort of just fade away and let the chandelier become the star of the show. The chandelier has small bits of gold accents, which meant I also had to work with that during my search. I ultimately selected and ordered these from Wayfair, I appreciated the simple glass shade, the price and the combo of nickel and brass accents.
We used this advice from Houzz to determine the appropriate hanging height, as these will live above our center island. Overall, I really love them, but the wonky wire is really distracting my eyes. I have read that the weight of the light will eventually straighten the wires, so I am giving them some time. Otherwise, I may add rods to dress them up a bit.
And that is where we are another week later. A few little details add up to a much more finished space. I am ready to start moving back in, but may be getting ahead of myself a bit. For now, I will just have to sit back, admire all of our hard work and play the hurry-up-and-wait game for the remaining pieces of the kitchen puzzle to arrive. Then we can get back at it!

You can follow all of the kitchen progress here.
P.S. Thank you SO much for nominating iHeart Organizing for the Better Homes & Gardens DIY Blogger Award! You can cast your vote here throughout the next six weeks. Bryan and I are continuously grateful for all of your support! Smooches!
Subscribe to:
Comments (Atom)


